
Ankle Sprains’ Healing Times
Ankle Sprains – Why Rest is Not The Answer
One minute you’re enjoying your sport. The next, an agonising pain and the sinking feeling of knowing you won’t be doing this again for a while. A nightmare for any fitness enthusiast – it happens in an instant, but ankle sprains’ healing times are frustratingly far from instantaneous.
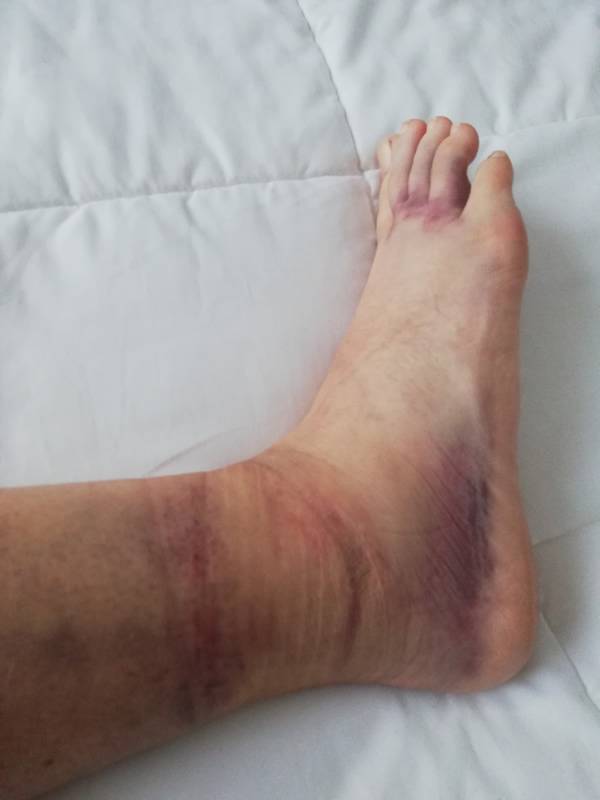
Yep, it’s a sprained ankle and a colourful one at that. For me, it all happened so quickly that I was on the ground before I could stop myself. I was walking along a typical uneven Vietnamese street in Danang and the slightest lapse of concentration cost me dearly.
Here I’ll discuss how to manage a sprained ankle from start to finish, including why rest is not the answer, exercises that you can and should do, supportive braces you can wear and ankle sprains’ healing times.

So what should you do first?
Well, first things first, sit down until the pain subsides. There’s no point in gritting your teeth to save face, let’s not pretend it doesn’t hurt. We all know it’s pretty excruciating for those first seconds, if not minutes.
Make Sure You Haven’t Fractured It
Time to think rationally. If there’s any chance you could have fractured it, go and get it looked it. Given the noise I heard and the amount of pain I was in, I called a Grab car and headed straight for a local hospital in Danang to get an x-ray. With hindsight I probably should have researched my hospitals before picking one. But sitting on a boiling hot pavement in tropical heat and extreme pain, reading up on the pros and cons of each hospital wasn’t on my agenda. I ended up at a nearby public one where they understood very little English. “X-ray” was at least a word they did understand and he could clearly see I was having some trouble walking, before I sat down and pointed to my ankle. Thankfully, they could communicate it was normal. Phew.
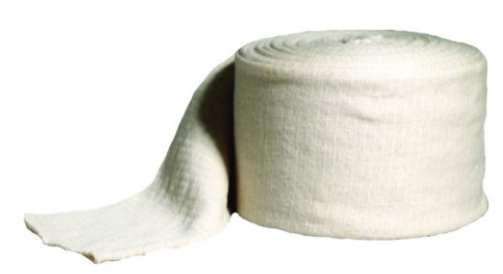
Check Out Good Prices on Quality Tubigrips on Amazon!
Time For A Second Opinion?
Be aware that some fractures can be missed on x-rays. If concerned, get a second opinion and/or request a second x-ray later. This is certainly advisable if you experience no improvement or worsening of symptoms over an extended period. Extensive bruising could also be indicative of a fracture. Also, if you hear a cracking sound when you twist it, or cannot bear weight, this may suggest a fracture. It’s much better to find out straight away if this is the case.
However, not all bruising is indicative of a fracture and there are no hard and fast rules. My ankle actually looked worse four days after I did, and since I had heard a crack I was concerned enough to get a second opinion. Travelling around Vietnam with an undiagnosed broken ankle was definitely not part of my travel plan, and if there was any chance I’d broken it, I wanted the right treatment as soon as possible.
Six days after my accident, I went to Danang International Hospital, where I was immediately seen by an orthopaedic doctor. He reviewed my x-rays from the other hospital and pointed out that the quality was not as good as it could be. After examining my ankle, he was concerned that I might have fractured it after all and referred me for an MRI. I was devastated and could barely hold back tears as I lay in the MRI scanner, worrying about the possibility of having to walk in a cast for 6-8 weeks.
Thankfully I was lucky. The scan confirmed I hadn’t fractured it after all, having only soft tissue damage. I was free to walk on it.
So, what next?
You’ve got all the clear but it hurts like hell. You want to exercise but your ankle says no.
Well, whilst going for a run isn’t on the cards for a while, it’s not all about sitting around with my feet up for a month either. Elevating your foot is great when you are stationary though.
There’s plenty you can do to assist healing. Walking on it IS recommended – the best way to get ankle ligaments to heal properly and without scar tissue is get straight back on them, gradually building up within pain limits. Sitting around might allow scar tissue to form quickly, but scar tissue is weak and makes you prone to reinjury. Whatever you do, it’s going to take time to heal, so let’s make sure it heals properly so you don’t have to go through this again!

RICE
RICE is still recommended initially, but some parts of this should be only short-term.
Rest
But not completely. If it’s very painful then limit how much walking you do for the first few days. Listen to your body and let pain be your guide.
Ice
This is a natural drug-free anti-inflammatory. Not that I’m against taking ibuprofen under these circumstances, if you wish and if you’re medically ok to take it. Don’t take drugs instead of applying ice though. Hands on treatment to locally target the area is key.
So how often and for how long?
Every health practitioner will tell you a different time / frequency to apply it, but ten mins per hour when convenient is what I go by. You should always leave long enough between applications for your skin to naturally return to normal temperature again.
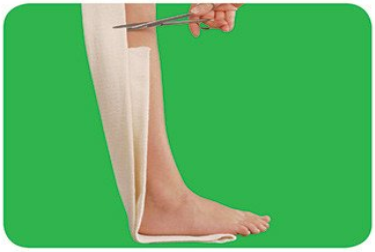
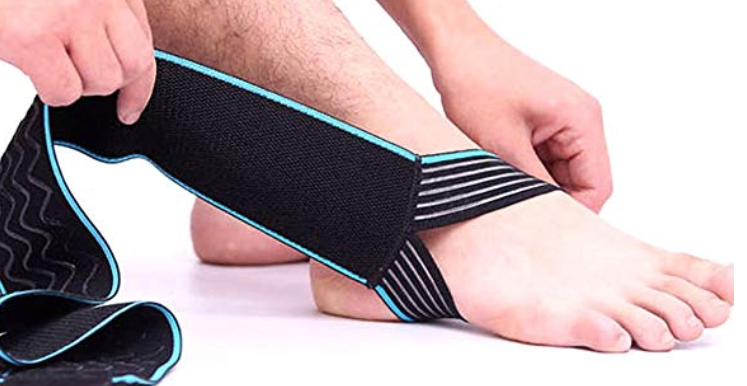
Compression
As well as keeping the swelling under control, promoting blood flow to the area is important to heal the tissues. I strongly recommend wearing some sort of ankle support. Ultimately, a sprain is an overstretching of the ligament/s, so after spraining it, the ankle will likely be unstable and very prone to reinjury. This is especially the case walking around uneven road surfaces, as I was still doing on streets and pavements in Danang. Whilst walking is excellent, try to avoid anything that significantly aggravates it. For me, this was tricky as I had to continue walking on uneven surfaces; every time I misjudged the terrain, I got a sharp pain again, which I believe was a small setback to prompt healing. The other side of this is it will help prevent scar tissue forming.
Whether you choose a designated ankle support, wrap-around strap or a tubi-grip, some sort of compression device is fundamental, especially when you’re on the move. I recommend a stronger ankle support initially, changing to a tubigrip later. If you’re struggling to find anything decent, then a doubled over tubigrip provides more support than a single layer.
How To Choose An Ankle Support
There are various factors to consider when buying an ankle support:
- Make sure it’s the right size. The simplest way to do this is to try it on prior to purchase (if possible) or buy an adjustable one. Buying a simple sleeve is not ideal. The chances of it being the perfect fit are slim, and if it stretches with use, then it’s too big – game over.
- Buy something breathable. It’s important to be comfortable and ideally not too sweaty underneath!
- Use a support with an open heel, especially if the material is thick. You still want to be able to get your shoe on comfortably.
- A strong, fairly thin support is usually better than a thick one. It’s more likely to be breathable and again, you’re more likely to be able to get your shoe on.
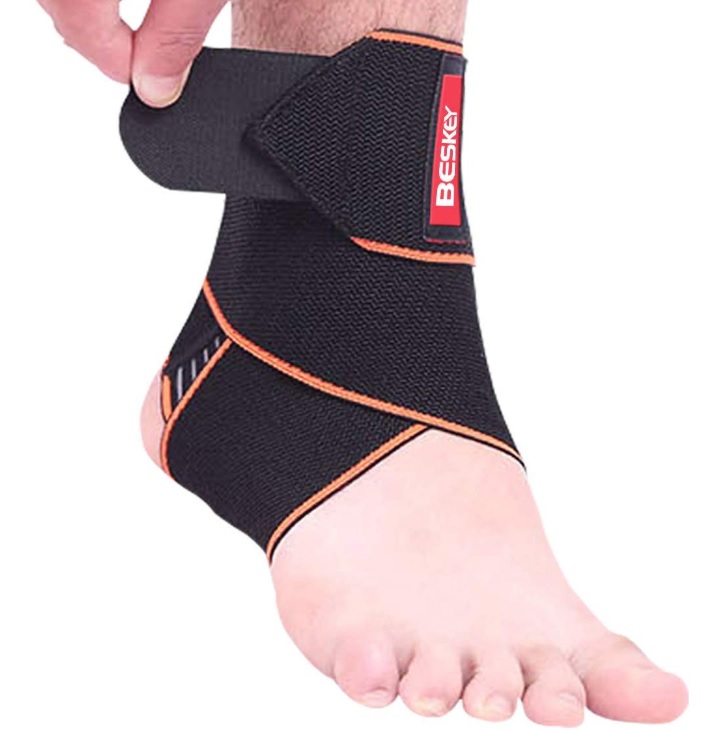
I recommend checking out this well-reviewed Beskey Ankle Support as it does all of the above at a very reasonable price.
Note, always take this off at night /when you are asleep.
You don’t want to wake up with a dead foot or worse to add to your problems.


Elevation
Ideally you should keep your ankle above the level of heart, which is best done by lying down and propping it up on a pillow. If this irritates your knee, then use more pillows under your knee to avoid hyper-extending it.
If this isn’t practical (and let’s face it, it’s not really if you’re sitting in public places!) then try to elevate it to hip level. At least this will help prevent fluid accumulating in the ankle. I’d frequently take my shoe off discreetly and prop my foot up on another chair in coffee shops etc. (With a sock on for hygiene!) The point of elevating it is to reduce swelling by allowing the fluid to drain.
So, it’s been a few days, the pain has reduced a little but significantly and you’ve barely exercised. You’ve been doing the above as much as you can bear and you’re keen to get out.
Time For The Next Stage Of Treatment
Whilst ice is great initially, after the first couple of days, getting blood to the ligaments is fundamental to speeding up healing. Start this part of the treatment process around 3 – 5 days after injury, depending on how severe your sprain is. You can continue icing too, but rehab should now be a combination of reducing inflammation and swelling, whilst promoting blood to the area for healing. So how do we do this?
1. Contrast Bathing
You’ll need containers big enough to fill with sufficient water that your ankle is submerged in it. Two buckets or one split bucket would be ideal. You’ll also need access to hot and cold water and ideally ice (cubes, or whatever shape they come in!).
Fill one with hot water – check with your hands first to ensure it is not too hot to dunk your foot in. The other container should contain water as cold as you can stand it. So, fill with cold water and an appropriate amount of ice cubes. Don’t give yourself burns or blue feet on my account.
Now you need to put your bad ankle and foot in each bucket alternately, leaving it in for around one minute per bucket. (Different researchers quote different time periods) Continue for ten minutes, ie five times in each bucket. You can also move your ankle by pointing you foot up and down and side to side when it’s in the hot bucket. Joints like motion, but sore ones don’t like weight-bearing. Mobilising the joint whilst you’re not standing on it should feel good.
In the early stages of your injury, end on cold. After the first couple of weeks when you’ve seen an improvement in pain, end on hot. This is because in the early stages of injury, there is still a lot of inflammation which needs to be reduced. Overheating in early stages could be provocative and make the pain worse. Listen to your body and don’t ignore pain. If it’s sore after a session of contrast bathing, you can apply for ice for ten minutes.
Getting better?
As your ankle improves, the focus should be more on directing blood to the area to assist healing. We also need to strengthen it to prevent reinjury. There is nothing good about ankle sprains’ healing times. The poor blood supply to ligaments is what makes the recovery time so lengthy. This is why it’s so important to manually do this to speed things up and prevent scar tissue.
For further reading on contrast bathing, check out these:

2. Direct Pressure
At this stage, the ideal scenario would be to see a Physiotherapist, Osteopath or Sports Massage Therapist. There’s no substitute for seeing a qualified professional who can examine you and work out exact what the best rehab programme is for you and administer treatment. But if you’re travelling and this isn’t practical, or on a budget and/or waiting list, you can still help yourself to get better in the meantime.
Remember we talked out the poor blood supply to ligaments, which in turn makes ankle sprains’ healing times slow?
Well, it’s time to directly encourage blood flow there yourself. Please make sure that several days have passed after your injury before you do the following. Doing this too early can be provocative, ie cause pain and make things worse. How many days? Well again, every expert has a different opinion, I’d go for 3 – 5 days.
How To Increase Blood Flow To Ligaments
What we want to achieve is manually directing blood towards the injured ligaments, to reduce ankle sprains’ healing times. So how do we do this?
Assuming you have a standard inversion sprain, the area on the outside of (lateral to) your ankle will be swollen and sore. The anterior talo-fibular ligament (ATFL) pictured below is most the commonly injured ligament when you sprain your ankle, followed by the calcaneo-fibular ligament (CFL), so let’s focus on these.
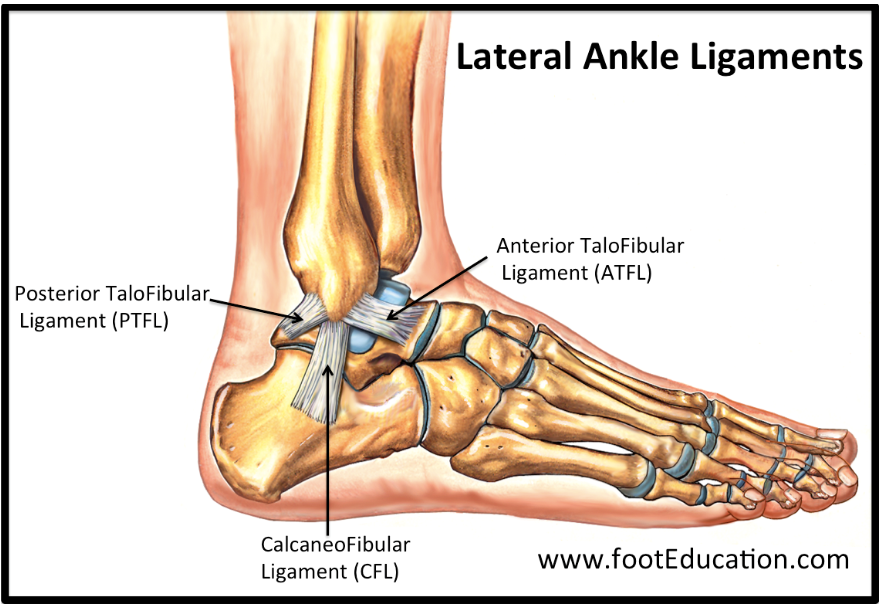
Let’s locate your ATFL first. Press directly just below and in front of the largest part of the swelling (where the bone normally protrudes) to locate a tender spot. Gently rub this small area with your finger – small circles in both directions and from side to side are fine, but this should all be done gently. You must avoid rubbing such that you are exacerbating the tear, ie pulling the ligament away from the bottom of the fibula (leg bone). Once you’ve you have spent 1 – 2 minutes here, move your finger back a little until you locate another tender spot, the CFL.
Again, avoid pushing directly downwards, which would be pulling the ligament away from the fibula. Working across the ligament from side to side is best, or in small circles. Small movements are key – the most important thing to remember is that applying pressure means increasing blood flow, ie you’re assisting healing. Pulling the ligament around brutally in all directions is not advisable and you could do more harm than good. If possible, consult a qualified practitioner.
To improve ankle sprains’ healing times you can do this regularly, keep it gentle.
Ankle Sprains’ Healing Times
Sprains are as different as people and ankle sprains’ healing times will depend on a number of factors. For example, how badly you’ve injured it, what structures you’ve injured, your general health and diet. Another huge factor is how much of the above you do to assist your own healing. A general guide for ligamentous injuries recovery is six to eight weeks, which sounds like an eternity. Yet it can take several months to feel truly 100% This is especially frustrating if you’re sporty and want to get back to full training. The good news is that rest is not the answer and exercise is very much on the menu.
Try to Stay Positive
It sucks, but letting it get you down isn’t going to help you or those who have supported you so far. Instead of focussing on what you can’t do, focus on what you can do. Running might have to wait, but if you can swim, this is an ideal starting point for returning to exercise.

Exercising with a Sprained Ankle
First up are rehab exercises. These are perhaps the least exciting, but most important. Strengthening your ankle and doing proprioception exercises are key. Proprioception is improving your awareness of your body’s position and its movement in space. This falls hand in hand with balance and we’ll look at exercises you can do now.
Rehab Exercises – Vital To Help Prevent Future Injury
1. Stand on One Leg.
What we’re looking to do here is create a potential instability, which in turn will make those ligaments and core muscles work to stabilize you. If you’re a little unsteady, this is good – you’ll be aware of those muscles contracting to stabilize you again. Continue for 30 seconds to a minute or until you feel fatigued. I recommend doing this on both legs. After all you don’t want to sprain your other ankle in future either! Also, this is an easy way to have a break without getting distracted – repeat so that you do it two or three times on each leg.
Too easy?
Try it with your eyes closed. By removing visual cues, this is likely to be harder, making those muscles work all the more.
2. Stand on an Unstable Surface.
This is where gym access comes in handy. Many gyms have a functional training area with equipment like BOSUs and wobble boards, which are ideal rehab toys:
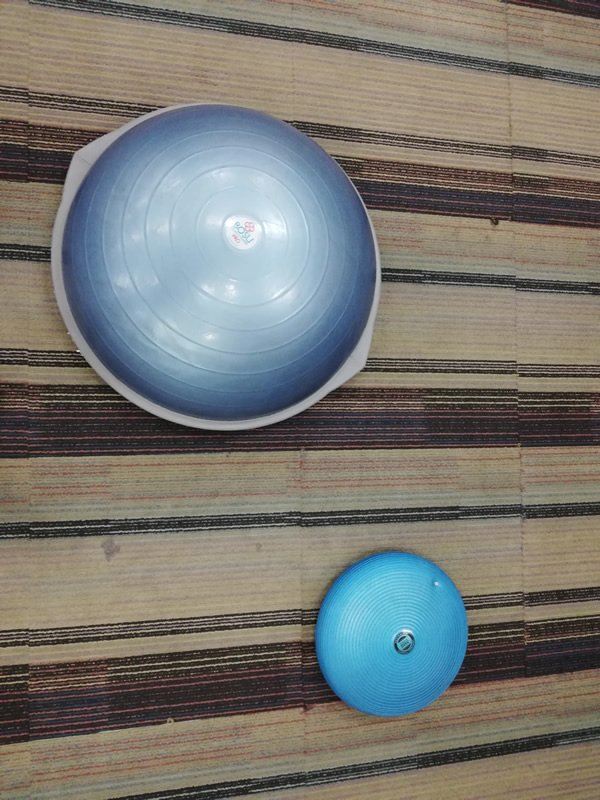
In the same way that standing on one leg and closing your eyes added layers of instability, so will these little beauties. I recommend starting with the wobble board and saving the BOSU for later in your recovery. The reason I say this is that the BOSU is larger and allows a greater degree of movement in your ankle (Use it this side up). If you use too early, it is more likely to elicit pain. The wobble board will be just as effective in activating those stabilizing structures in your ankle.
Note that there are different types of wobble board around. Some are air-filled discs like the one pictured. You’ll also see ones which resemble a flat surface on a squashed hemisphere. I personally prefer the air-filled ones, which are usually lighter to carry around too, but it’s up to you.

General Exercise
1. Walking
Contrary to what they used to believe, bed rest is not the answer to sprains. They will likely heal with weak scar tissue if you spend your days lying around. So get up and get weight-bearing. Start with short walks at first, but go a couple of times a day. Once the pain starts to improve, increase your frequency and length of walk. I strongly recommended wearing an ankle support, especially if your terrain is anything other than smooth and flat.

2. Swimming
The beauty of swimming is that it’s a non-weight-bearing exercise. So, you can get a good workout, safe in the knowledge that you’re unlikely to do your ankle any further damage. But do take extra care walking on a wet poolside. The second big advantage to swimming is that it actually mobilises the ankle joint in the water – ideal therapy. So if you’re doing front crawl for example, your ankle will automatically dorsiflex and plantarflex (bend up and down) as you kick gently. This might well feel a little sore, so if you need to, reduce the kicking you do with this leg in the initial stages. It should start to feel easier each time you go, though may be stiff at first.
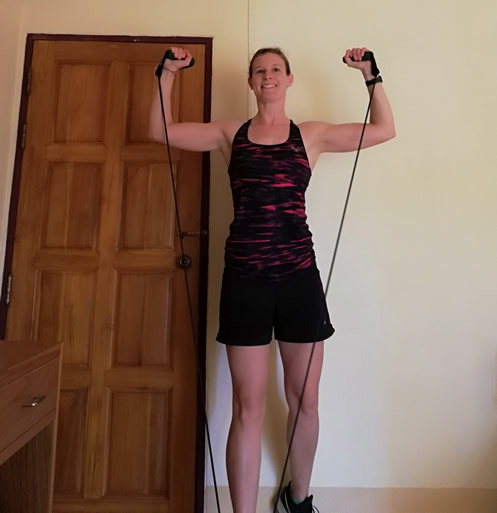
3. Upper Body and Core
The first workout I did after my ankle sprain was to hit the weights in the gym. From experience, I recommend you DON’T do squats or lunges. This puts a lot of pressure through the ankle joint, it hurts and it won’t do you any good in the early stages and will likely increase ankle sprains’ healing times. Once your ankle is considerably better, start with a low (or no) weight and don’t go deep. Listen to your body. If it hurts, stop.
I focussed on upper body weights in gym and personally prefer free weights. If you’re not used to weight training, talk to gym staff first – getting technique right at the outset is important if you don’t want another injury to add to your list. Also, unless you’re used to regular weight-training, don’t work the same muscles every day or they’ll soon start complaining too. I recommend mixing up weight training with other forms of exercise.
Don’t fancy hobbling around a gym?
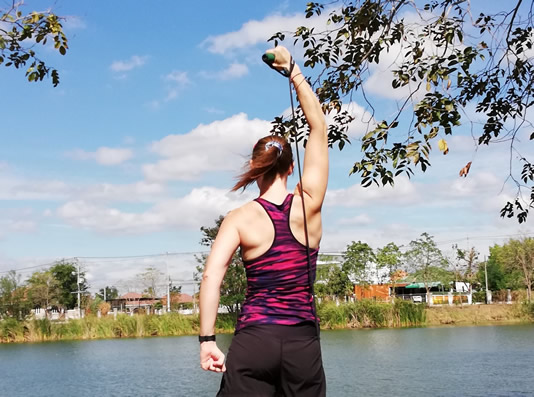
Check out my recommendations for Types of Resistance Bands here.
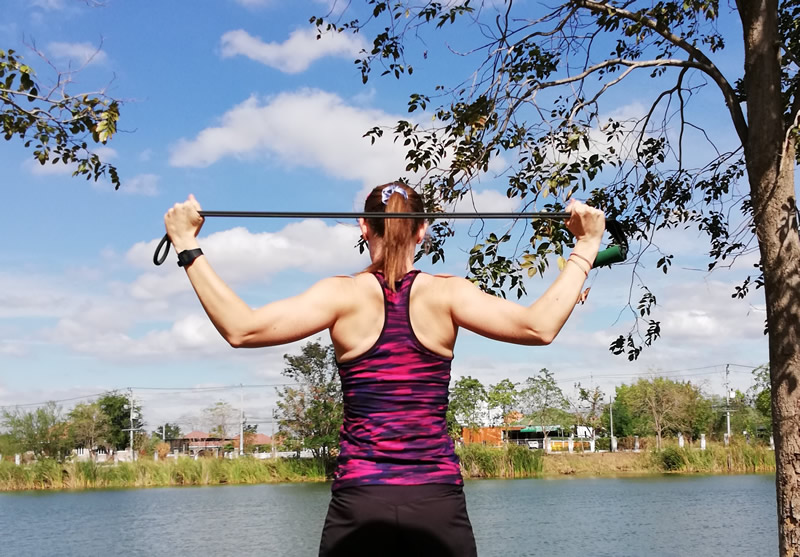


Core stability work is superb for posture, strength and preventing reinjury. I personally believe it should be a big part of everyone’s routine, young or old, injured or not. Pilates and Yoga are two awesome disciplines, though if you attend a class, you’ll likely find some exercises will aggravate your ankle. If you know what you’re doing, do your own mat work in the gym, otherwise talk to your instructor so he / she can recommend alternatives for you.
4. Alternative Cardio
Does your gym have arm bikes? This is ideal for a new injury as your foot just isn’t involved at all. A little later, cycling on regular bikes is a good option. Beware this does put some pressure on your ankle though, so it may not be ideal at first.
I initially thought the crosstrainer would be a good starting point, however I did it too early and was in pain within five minutes. The crosstrainer is low impact which is a good thing, but you are still bearing all your weight, unlike on a bike. Best leave this until a bit later in the recovery process.
When to Ditch Your Ankle Support
Wearing an ankle support in the early to medium recovery stages is an excellent idea. These supports provide compression (part of the RICE process), whilst helping to prevent further injury retwisting it. They are highly beneficial to recovery, but when should you stop wearing them?
I recommend stopping gradually. In the early stages you’d be wise to wear it whenever you’re active, even for short walks. But once your ankle’s pain levels reduce and you’ve regularly done the rehab exercises for a couple of weeks, I’d begin restricting its use. DO continue with the exercises though. Your ankle should now be getting stronger and you don’t want to be dependent upon a support to do what your ligaments should be doing. At least not forever.
The number of weeks will vary depending on how bad your sprain was, but I stopped wearing my ankle support for short walks (on even ground) after about four weeks. For longer walks or those on rougher terrain, I used it for considerably longer. If you’re jogging, running or doing other riskier sports, I’d continue wearing the support until the ankle feels closer to 100%.
Better still, reduce the support level gradually. If you’ve been using something with a high level of support like Beskey Ankle Support, then switching to a tubigrip is a good option. You’ll still get some support for peace of mind, but with a little more freedom of movement.
Check Out Good Prices on Quality Tubigrips on Amazon!
I strongly recommend that you don’t substitute proper rehab with an ankle support. A support might reduce the chance of reinjury whilst you’re wearing it, but once you take it off, your ankle is once again vulnerable to further sprains if you haven’t strengthened it. Get back on that wobble board.
When I worked as an osteopath, I met several people who had recurring sprains throughout their lives. This isn’t coincidence; when I asked what sort of rehab and exercises they had done after their previous sprains, I learnt they hadn’t done any, as they hadn’t known what to do. Their ligaments had healed weakly with scar tissue, leaving them prone to further injury.
Getting back to Jogging / Running
I don’t recommend doing this at all for at least six weeks, and thereafter it depends on how your ankle feels. This high impact form of exercise is very likely to provoke pain in anything other than an fully healthy ankle. I strongly recommend you don’t do this too early in the recovery process. If / when you do, be sure to wear an ankle support initially as discussed earlier. Start slowly and listen to your body. Remember, the faster you go, the greater the impact. Pain is a sign you’ve gone back too soon and could increase your ankle sprain’s healing time.
Summary
There’s nothing fair or right about spraining your ankle, least of all, ankle sprains’ healing times. But there are things you can do to speed up recovery and to ensure your ankle heals strongly, thus reducing the likelihood of reinjury. In summary, these are:
- Rule out any possibility of a fracture
- RICE
- Invest in a Good Ankle Support
- Contrast bathing and Direct Pressure
- Rehab Exercises
- General Exercise
Ankle sprains’ healing times is likely to be a minimum of six weeks, but in bad sprains could be considerably longer. If you’re concerned that things aren’t getting better, go and get checked out again. Fractures can sometimes be missed on initial x-rays.
This advice is no substitute for seeing a qualified professional and is my opinion only, from my previous studies and personal experience of sprains and what has worked for me. I take no responsibility for your choices, but I hope the above has been useful. Wishing you a speedy recovery and prompt return to full training.
Enjoyed this?

Check out my other Articles here.
Five Top Tips For Keeping Fit Around the World
How to Look Ripped on Your Travel Adventure – For Free!
Need Travel Insurance?
Check out my feature on Travel Insurance for Adventurers!
Please Like and Share on Facebook if you enjoyed my article – Thank You
I have just sprained my ankle when I slipped on a sausage that slipped off my child’s dinner plate. I fell very hard but the sausage remained intact (until the dog ate it). Probably helped that my hubby had overcooked it on the barbie!
Do you have any advice my swollen ankle?
Thank you, Gwen from Australia.
Great article, those pictures are exactly what happened to me
thank you !
How soon after the sprain should you start the rehab–standing one on it and walking? Mine still hurts too much to put all my weight on it.
Have you ruled out a fracture? If there is any chance of that, you need to eliminate that possibility first.